Meet Studio: Your New Favorite Way to Develop WordPress Locally

Say goodbye to manual tool configuration, slow site setup, and clunky local development workflows, and say hello to Studio by WordPress.com, our new, free, open source local WordPress development environment.

We’ve built Studio to be the fastest and simplest way to build WordPress sites locally.

Designed to empower developers, designers, and site builders, Studio offers a seamless solution for creating and running WordPress sites directly on your local machine, as well as showcasing work-in-progress sites with your clients, teams, and colleagues.

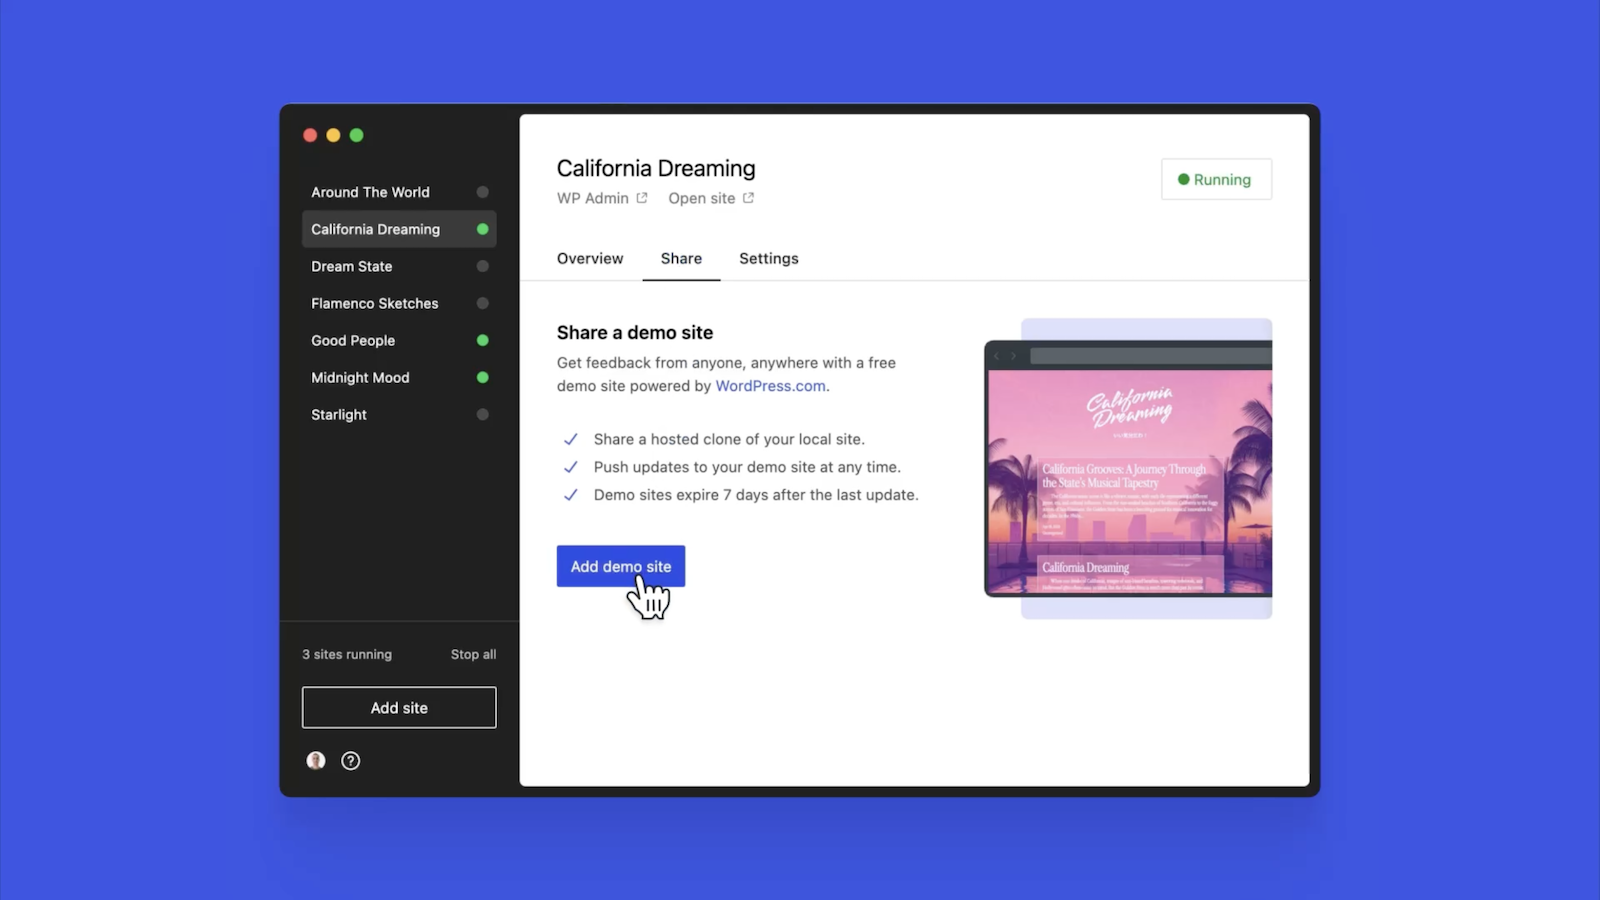
Check out a few of our favorite features in the video below:

A new way to develop WordPress locally, available for free

Studio is now available to use for free on Mac*, and you can get up and running with a new local site in just a few minutes:

Download Studio for Mac.

Install and open Studio.

Click Add site, and you’re done!

Once you have a local site running, you can access WP Admin, the Site Editor, global styles, and patterns, all with just one click—and without needing to remember and enter a username or password.

You can even open your local sites in your favorite development tools, such as VS Code, PhpStorm, Terminal, and Finder, making it even easier to add Studio to your existing development workflow.

Plus, Studio is open source; feel free to fork away on GitHub.

*A Windows version of Studio is coming soon, and you can request early access here. 

Effortlessly share your work and keep moving forward

In the realm of web development, showcasing local work has often been a challenge when projects live solely on your machine. With Studio’s demo sites, you have a convenient, built-in solution for sharing your progress with your team, clients, or designers. 

These publicly-accessible demo sites, hosted on WordPress.com, are a convenient way to share your work without the need for complex server setups or lengthy deployments. In less than 15 seconds, you can have a shareable link to your local site that stays active for seven days.

The best part? Demo sites can be refreshed to reflect your latest build, allowing you to easily convey any updates or changes!

Breaking free from traditional constraints

Unlike traditional local environment tools like MAMP or Docker, Studio takes a fresh approach to local WordPress development. Studio is a lightweight and efficient solution that minimizes overhead and maximizes simplicity by forgoing the need for web servers, MySQL servers, or virtualization technologies.

Behind the scenes, Studio uses WordPress Playground, the WebAssembly-powered PHP binary. Thanks to this technology, there is no need to use a traditional web server, making your development experience much quicker and smoother.

Say goodbye to complex setups and compatibility issues. Studio makes it easier than ever to build and manage WordPress sites locally.

Let’s get building

At WordPress.com, we’re committed to making your website management experience seamless. In the last few years alone, we launched staging sites with synchronization features, SSH and WP-CLI access, global edge caching, GitHub Deployments, and more. 

Studio is yet another powerful feature to add to your toolkit. Stay tuned for more exciting updates, and remember to follow our blog to stay in the loop.

And, of course, download Studio today. Your local development workflow will thank you.

Major kudos to the Studio team on this launch! Antonio Sejas, Antony Agrios, Kateryna Kodonenko, Philip Jackson, Carlos García Prim, David Calhoun, Derek Blank, Siobhan Bamber, Tanner Stokes, Matt West, Adam Zielinski, Brandon Payton, Berislav Grgicak, Alexa Peduzzi, Jeremy Massel, Gio Lodi, Olivier Halligon, Matthew Denton, Ian Stewart, Daniel Bachhuber, Kei Takagi, Claudiu Filip, Niranjan Uma Shankar, Noemí Sánchez, and our beta testers.
Quelle: RedHat Stack

WordPress Block Patterns Give You Superpowers

With the power of block patterns you’ll be a WordPress superstar in no time, whether you’re an establish pro or just starting out. Block patterns are professionally designed layouts that you can add your site in a single click. What makes them especially powerful is that once they’re inserted, you can edit and customize every aspect. (Or, you can leave them be!)

In today’s Build and Beyond video, Jamie Marsland walks you through everything you need to go to become a block pattern expert, in under four minutes.

Get started on your site today with a free trial:

WordPress.com/Jamie

Quelle: RedHat Stack

10 Amazing WordPress Design Resouces

Designing a beautiful website from scratch can be difficult for developers of all skill levels. Luckily, in today’s Build and Beyond video, Jamie Marsland reveals his ten favorite WordPress design tools and websites to elevate your next build.

Get inspiration for your next website’s design and then start building with WordPress.com. Ready to get going? Click below to embark on your free trial today:

WordPress.com/Jamie

Here are the sites and resources mentioned in the video:

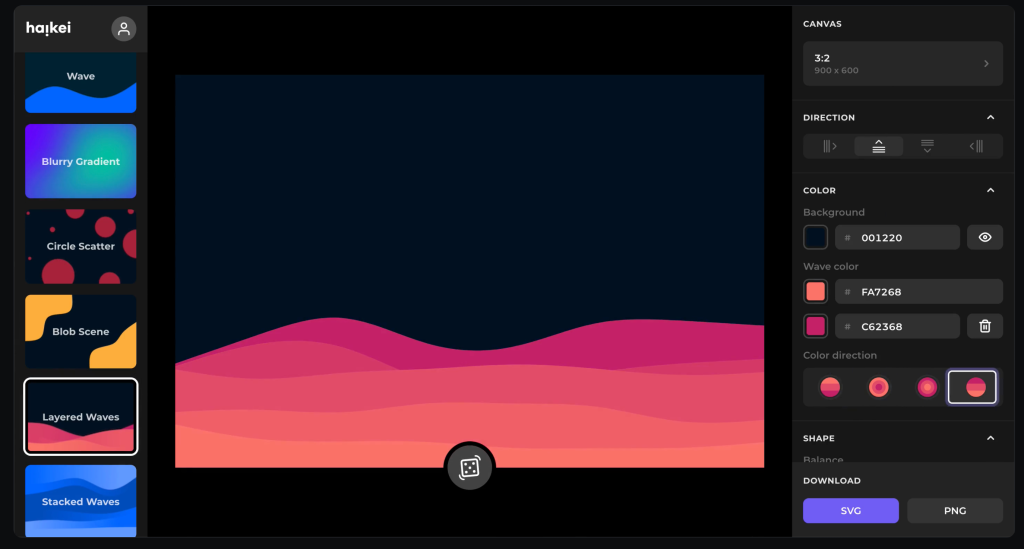
Heikei

Stunning backgrounds and visuals

WordPress.com Assembler

A design-your-own-theme tool using block patterns

Glassmorphism

Free CSS generator for a glass effect

Designspiration

Save and explore inspiring designs

Shots

Easy mockups for products and thumbnails

WordPress.com Pattern Library

WordPress.com’s free library of block patterns

Coolors

Generate color palettes with a click

WordPress.org Pattern Library

Another block pattern library, but with community-uploaded designs

Midjourney

The best AI image generator

Instant Images

WordPress plugin to easily find free-to-use images

Quelle: RedHat Stack

Making 43% of the Web More Dynamic with the WordPress Interactivity API

Creating rich, engaging, and interactive website experiences is a simple way to surprise, delight, and attract attention from website readers and users. Dynamic interactivity like instant search, form handling, and client-side “app-like” navigation where elements can persist across routes, all without a full page reload, can make the web a more efficient and interesting place for all.

But creating those experiences on WordPress hasn’t always been the easiest or most straightforward, often requiring complex JavaScript framework setup and maintenance. 

Now, with the Interactivity API, WordPress developers have a standardized way for doing that, all built directly into core. 

The Interactivity API started as an experimental plugin in early 2022, became an official proposal in March 2023, and was finally merged into WordPress core with the release of WordPress 6.5 on April 2, 2024. It provides an easier, standardized way for WordPress developers to create rich, interactive user experiences with their blocks on the front-end.

ELI5: The Interactivity API and the Image Block

Several core WordPress blocks, including the Query Loop, Image, and Search blocks, have already adopted the Interactivity API. The Image block, in particular, is a great way to show off the Interactivity API in action. 

At its core, the Image blocks allow you to add an image to a post or page. When a user clicks on an image in a post or page, the Interactivity API launches a lightbox showing a high-resolution version of the image.

The rendering of the Image block is handled server-side. The client-side interactivity, handling resizing and opening the lightbox, is now done with the new API that comes bundled with WordPress. You can bind the client-side interactivity simply by adding the wp-on–click directive to the image element, referencing the showLightbox action in view.js.

You might say, “But I could easily do this with some JavaScript!” With the Interactivity API, the code is compact and declarative, and you get the context (local state) to handle the lightbox, resizing, side effects, and all of the other needed work here in the store object.

actions: {
showLightbox() {
const ctx = getContext();

// Bails out if the image has not loaded yet.
if ( ! ctx.imageRef?.complete ) {
return;
}

// Stores the positons of the scroll to fix it until the overlay is
// closed.
state.scrollTopReset = document.documentElement.scrollTop;
state.scrollLeftReset = document.documentElement.scrollLeft;

// Moves the information of the expaned image to the state.
ctx.currentSrc = ctx.imageRef.currentSrc;
imageRef = ctx.imageRef;
buttonRef = ctx.buttonRef;
state.currentImage = ctx;
state.overlayEnabled = true;

// Computes the styles of the overlay for the animation.
callbacks.setOverlayStyles();
},

The lower-level implementation details, like keeping the server and client side in sync, just work; developers no longer need to account for them.

This functionality is possible using vanilla JavaScript, by selecting the element via a query selector, reading data attributes, and manipulating the DOM. But it’s far less elegant, and up until now, there hasn’t been a standardized way in WordPress of handling interactive events like these.

With the Interactivity API, developers have a predictable way to provide interactivity to users on the front-end. You don’t have to worry about lower-level code for adding interactivity; it’s there in WordPress for you to start using today. Batteries are included.

How is the Interactivity API different from Alpine, React, or Vue?

Prior to merging the Interactivity API into WordPress core, developers would typically reach for a JavaScript framework to add dynamic features to the user-facing parts of their websites. This approach worked just fine, so why was there a need to standardize it?

At its core, the Interactivity API is a lightweight JavaScript library that standardizes the way developers can build interactive HTML elements on WordPress sites.

Mario Santos, a developer on the WordPress core team, wrote in the Interactivity API proposal that, “With a standard, WordPress can absorb the maximum amount of complexity from the developer because it will handle most of what’s needed to create an interactive block.”

The team saw that the gap between what’s possible and what’s practical grew as sites became more complex. The more complex a user experience developers wanted to build, the more blocks needed to interact with each other, and the more difficult it became to build and maintain sites. Developers would spend a lot of time making sure that the client-side and server-side code played nicely together.

For a large open-source project with several contributors, having an agreed-upon standard and native way of providing client-side interactivity speeds up development and greatly improves the developer experience.

Five goals shaped the core development team’s decisions as they built the API: 

Block-first and PHP-first: Prioritizing blocks for building sites and server side rendering for better SEO and performance. Combining the best for user and developer experience.

Backward-compatible: Ensuring compatibility with both classic and block themes and optionally with other JavaScript frameworks, though it’s advised to use the API as the primary method. It also works with hooks and internationalization.

Declarative and reactive: Using declarative code to define interactions, listening for changes in data, and updating only relevant parts of the DOM accordingly.

Performant: Optimizing runtime performance to deliver a fast and lightweight user experience.

Send less JavaScript: Reduce the overall amount of JavaScript being sent on the page by providing a common framework that blocks can reuse.  So the more that blocks leverage the Interactivity API, the less JavaScript will be sent overall.

Other goals are on the horizon, including improvements to client-side navigation, as you can see in this PR.

Interactivity API vs. Alpine

The Interactivity API shares a few similarities to Alpine—a lightweight JavaScript library that allows developers to build interactions into their web projects, often used in WordPress and Laravel projects.

Similar to Alpine, the Interactivity API uses directives directly in HTML and both play nicely with PHP. Unlike Alpine, the Interactivity API is designed to seamlessly integrate with WordPress and support server-side rendering of its directives.

With the interactivity API, you can easily generate the view from the server in PHP, and then add client-side interactivity. This results in less duplication, and its support in WordPress core will lead to less architectural decisions currently required by developers. 

So while Alpine and the Interactivity API share a broadly similar goal—making it easy for web developers to add interactive elements to a webpage—the Interactivity API is even more plug-and-play for WordPress developers.

Interactivity API vs. React and Vue

Many developers have opted for React when adding interactivity to WordPress sites because, in the modern web development stack, React is the go-to solution for declaratively handling DOM interactivity. This is familiar territory, and we’re used to using React and JSX when adding custom blocks for Gutenberg.

Loading React on the client side can be done, but it leaves you with many decisions: “How should I handle routing? How do I work with the context between PHP and React? What about server-side rendering?”

Part of the goal in developing the Interactivity API was the need to write as little as little JavaScript as possible, leaving the heavy lifting to PHP, and only shipping JavaScript when necessary.

The core team also saw issues with how these frameworks worked in conjunction with WordPress. Developers can use JavaScript frameworks like React and Vue to render a block on the front-end that they server-rendered in PHP, for example, but this requires logic duplication and risks exposure to issues with WordPress hooks.

For these reasons, among others, the core team preferred Preact—a smaller UI framework that requires less JavaScript to download and execute without sacrificing performance. Think of it like React with fewer calories.

Luis Herranz, a WordPress Core contributor from Automattic, outlines more details on Alpine vs the Interactivity API’s usage of Preact with a thin layer of directives on top of it in this comment on the original proposal.

Preact only loads if the page source contains an interactive block, meaning it is not loaded until it’s needed, aligning with the idea of shipping as little JavaScript as possible (and shipping no JavaScript as a default).

In the original Interactivity API proposal, you can see the run-down and comparison of several frameworks and why Preact was chosen over the others.

What does the new Interactivity API provide to WordPress developers?

In addition to providing a standardized way to render interactive elements client-side, the Interactivity API also provides developers with directives and a more straightforward way of creating a store object to handle state, side effects, and actions.

Graphic from Proposal: The Interactivity API – A better developer experience in building interactive blocks on WordPress.org

Directives

Directives, a special set of data attributes, allow you to extend HTML markup. You can share data between the server-side-rendered blocks and the client-side, bind values, add click events, and much more. The Interactivity API reference lists all the available directives.

These directives are typically added in the block’s render.php file, and they support all of the WordPress APIs, including actions, filters, and core translation APIs. 

Here’s the render file of a sample block. Notice the click event (data-wp-on–click=”actions.toggle”), and how we bind the value of the aria-expanded attributes via directives.

<div
<?php echo get_block_wrapper_attributes(); ?>
data-wp-interactive="create-block"
<?php echo wp_interactivity_data_wp_context( array( 'isOpen' => false ) ); ?>
data-wp-watch="callbacks.logIsOpen"
>
<button
data-wp-on–click="actions.toggle"
data-wp-bind–aria-expanded="context.isOpen"
aria-controls="<?php echo esc_attr( $unique_id ); ?>"
>
<?php esc_html_e( 'Toggle', 'my-interactive-block' ); ?>
</button>

<p
id="<?php echo esc_attr( $unique_id ); ?>"
data-wp-bind–hidden="!context.isOpen"
>
<?php
esc_html_e( 'My Interactive Block – hello from an interactive block!', 'my-interactive-block' );
?>
</p>
</div>

Do you need to dynamically update an element’s inner text? The Interactivity API allows you to use data-wp-text on an element, just like you can use v-text in Vue.

You can bind a value to a boolean or string using wp-bind– or hook up a click event by using data-wp-on–click on the element. This means you can write PHP and HTML and sprinkle in directives to add interactivity in a declarative way.

Handling state, side effects, and actions

The second stage of adding interactivity is to create a store, which is usually done in your view.js file. In the store, you’ll have access to the same context as in your render.php file.

In the store object, you define actions responding to user interactions. These actions can update the local context or global state, which then re-renders and updates the connected HTML element. You can also define side effects/callbacks, which are similar to actions, but they respond to state changes instead of direct user actions.

import { store, getContext } from '@wordpress/interactivity';

store( 'create-block', {
actions: {
toggle: () => {
const context = getContext();
context.isOpen = ! context.isOpen;
},
},
callbacks: {
logIsOpen: () => {
const { isOpen } = getContext();
// Log the value of `isOpen` each time it changes.
console.log( `Is open: ${ isOpen }` );
},
},
} );

Try it out for yourself

The Interactivity API is production-ready and already running on WordPress.com! With any WordPress.com plan, you’ll have access to the core blocks built on top of the Interactivity API. 

If you want to build your own interactive blocks, you can scaffold an interactive block by running the below code in your terminal:

npx @wordpress/create-block@latest my-interactive-block –template @wordpress/create-block-interactive-template 

This will give you an example interactive block, with directives and state handling set up. 

You can then play around with this locally, using wp-env, using a staging site, or by uploading the plugin directly to your site running a plugin-eligible WordPress.com plan. 

If you want a seamless experience between your local dev setup and your WordPress.com site, try using it with our new GitHub Deployments feature! Developing custom blocks is the perfect use case for this new tool.

The best way to learn something new is to start building. To kick things off, you may find the following resources a good starting point:

A first look at the Interactivity API

Interactivity API WP Movies demo and demo video

Follow along with this task for improvements coming to the Interactivity API

Block editor reference

Proposal: Interactivity API

GitHub issue for showcase

Quelle: RedHat Stack
WordPress Website Speed Build: The Masters Golf Tournament

Congratulations are in order for Scottie Scheffler, the winner of the 2024 Masters Tournament in Augusta, Georgia! In today’s Build and Beyond video, Jamie Marsland takes on the slightly less intimidating task of re-creating the Masters website as quickly as he can. Can he possibly do it in just 30 minutes?

Along the way, you’ll learn about sticky navigation menus, image overflows and breakouts, card layouts, and more.

Interested in a free trial that allows you to test our all that WordPress.com has to offer? Click below:

WordPress.com/Jamie

Quelle: RedHat Stack

Registering Custom Post Types in the WordPress Admin: Our CloudFest Hackathon Report

With WordPress today you need to use custom code or a plugin to create a custom post type like “Book” or “Member.” This is a popular need, and there are a variety of approaches; however, one challenge is that the end-user experience can be confusing and non-standardized.

A few weeks ago, some Automatticians and I went to the 7th CloudFest Hackathon in Rust, Germany to explore a solution for this. We started hacking on a deeply nerdy project, JSON Schema forms and fields, and ended up with a fascinating approach to an age-old question: What if you could register custom post types and custom fields directly in the WordPress admin?

Forty-eight hours turns an idea into reality

The CloudFest Hackathon is an event that allows developers from around the globe to take ideas and turn them into realities.

During the Hackathon, teams of developers from various content management systems and hosting companies come together to contribute to projects that align with the core principles of the event: the projects must be not-for-profit, interoperable, and open source.

Last year, we worked on a project that allowed us to embed WordPress directly in VS Code. We built the WordPress Playground VS Code extension on top of WordPress Playground. It uses WebAssembly to run WordPress entirely within the browser, and it turned out pretty darn slick. 

This year, we focused on a JSON Schema Field/Form Renderer. While most of us explored using JSON Schema to dynamically register admin forms and fields, Dennis Snell and Adam Zieliński decided to take the project one step further! They hacked together a plugin that introduced the ability to register custom post types and custom fields directly from the WordPress admin. More notably, everything happens within the block editor—you have to see it to believe it:

This work poses some interesting possibilities for custom post type and custom field implementation because it could fundamentally change the way low- to no-code WordPress users modify their sites.

Naturally, I took the idea to Twitter/X:

Should WordPress let you register custom post types and custom fields from the admin? #CFHack2024— daniel (@dbchhbr) March 17, 2024

I got quite a range of responses, ranging from “Heck Yes! It should have already been a core feature now. Such an integral part of every other site” to “Admin should only be for content and user management. Everything else should be configured in code and version controllable.”

So why the range in responses? Let’s discuss.

It turned out to be pretty simple

Dennis and Adam built our prototype using the following conventions:

A custom post type wp_data_type holds templates for user-defined data types.

The title of a post in the wp_data_type defines the name of the new data type. The post itself is the rendering template and comprises any set of normal blocks. Names are given to select block attributes within the post, and these names are mapped into the data type.

When creating new posts for the given data type, the locked template is copied from the wp_data_type template, and the block attribute annotations are preserved.

Finally, when rendering the wp_data_type template, the attributes are pulled from the individual post of the given data type and spliced into the template.

The fascinating idea is that we don’t have to think about form fields; blocks already provide a rendering view and a modal editing experience. We can rely on the fundamental way blocks work and use the very same user experience to create custom data types in a way that users are already familiar with when editing a post or a site.

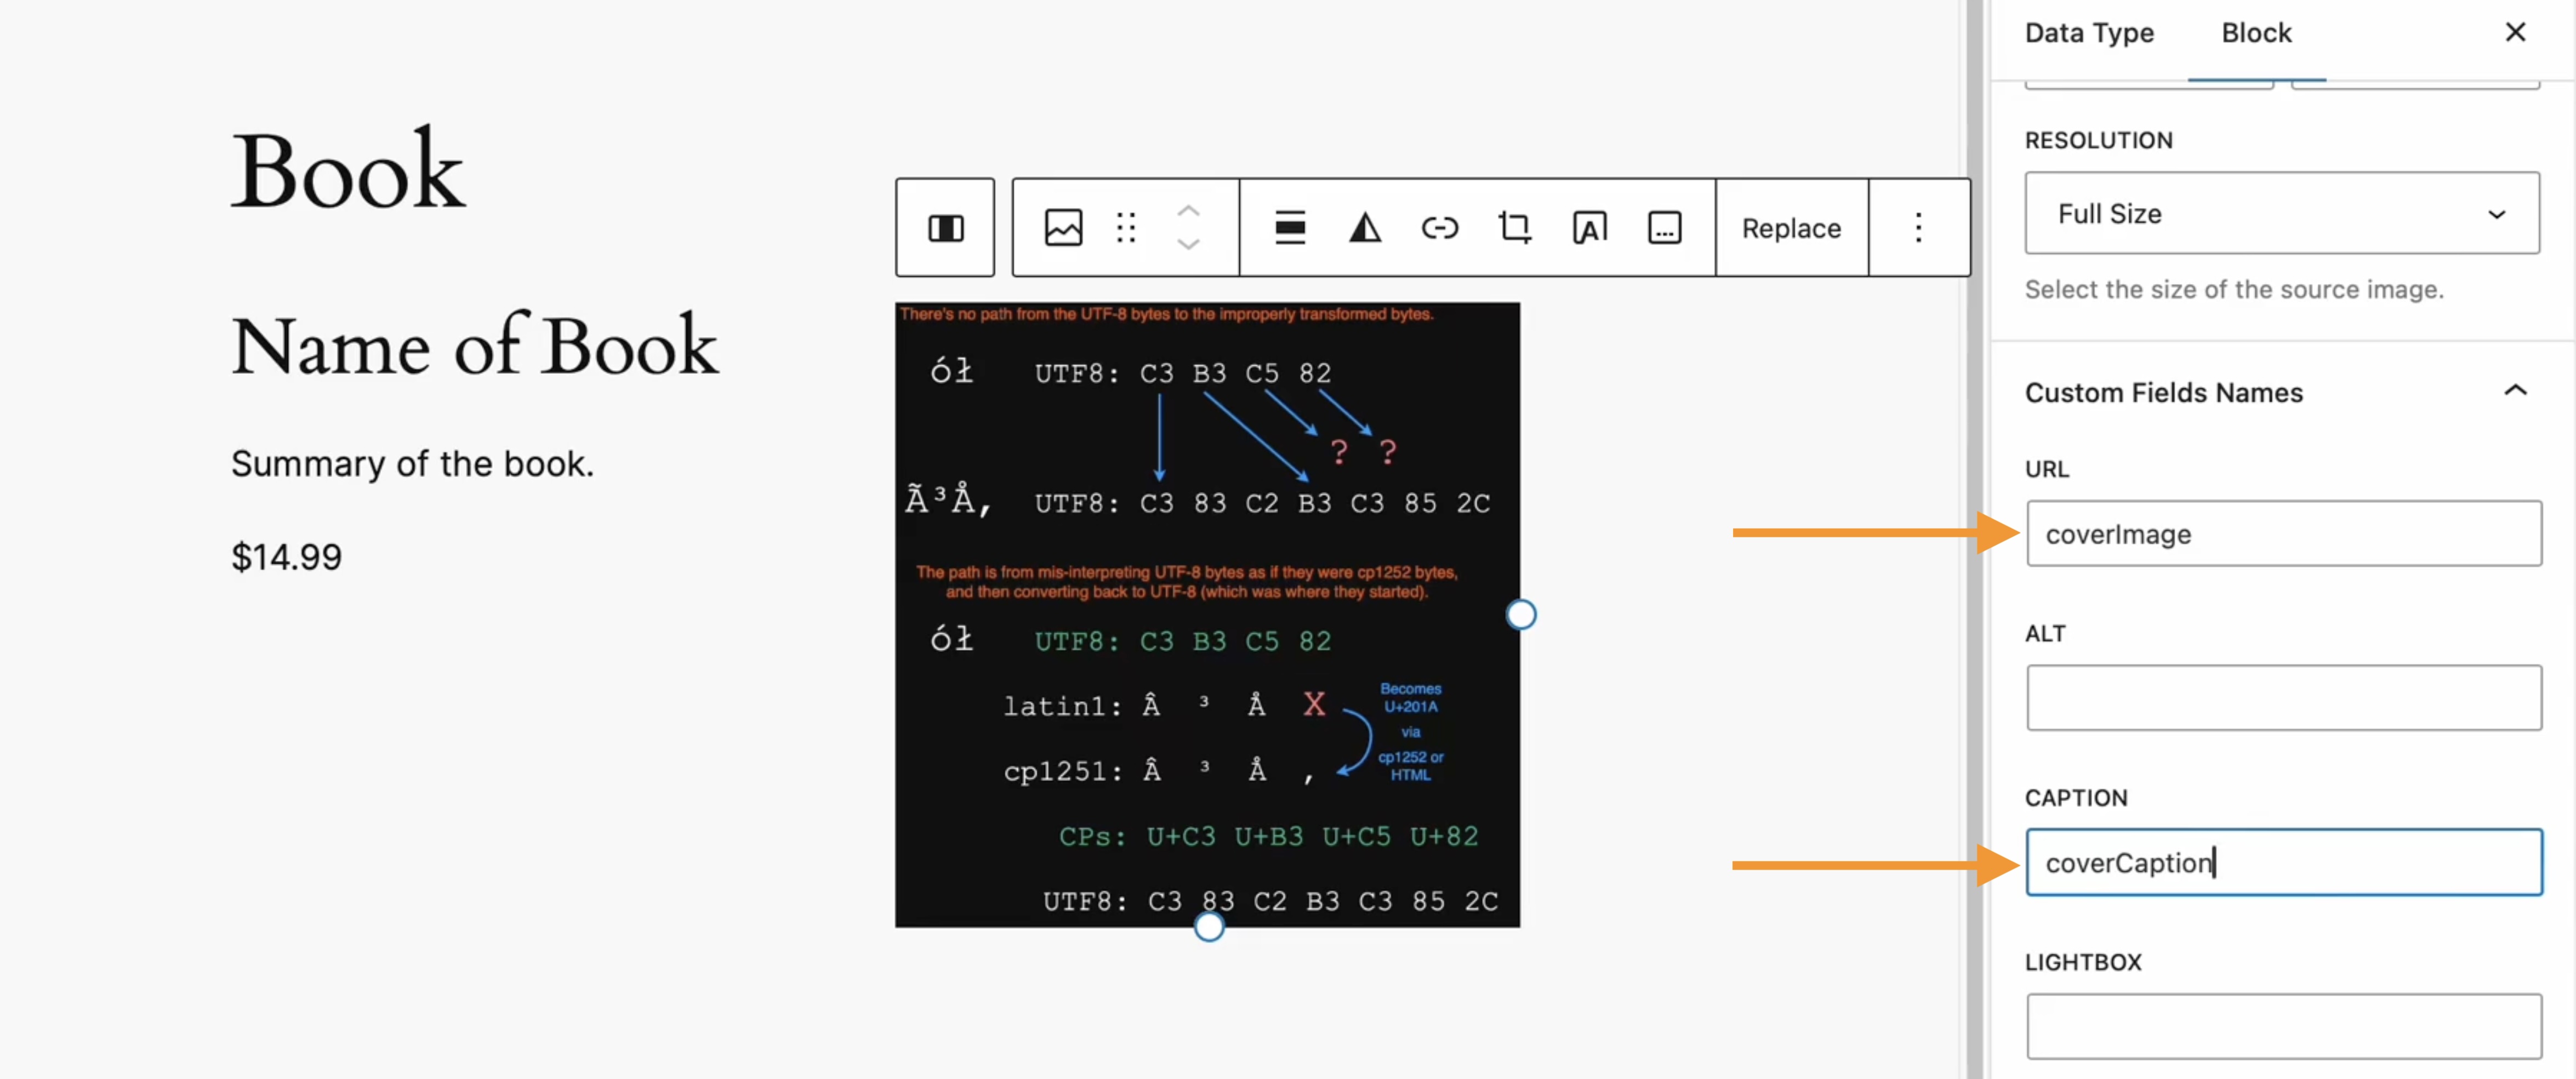
We can provide JSON-LD markup properties to the block editor using our Custom Fields Names block settings.

Custom post types define custom data types, so we use a template to not only define the data type, but also to provide a default rendering template. Each data attribute within a post type has a field where it’s possible to define that field with its JSON-LD property. 

For example, say you had a “Book” custom post type. A few JSON-LD properties you could define using custom fields are:

description

copyrightYear

author

bookEdition

bookFormat

isbn

numberOfPages

We also chose to store a copy of each block attribute in the JSON attributes for that block. Since WordPress can now provide a post-to-JSON function, which merges the extracted attributes with the names assigned in the custom post type template, that template may have changed since the custom post was created. This means that no database migrations are necessary to render an updated version of a post.

The best part? The WordPress infrastructure that already exists (aka Gutenberg!) defines the data type. Because these custom posts are normal posts, and because they adopt the locked template for the data type definition, they are, in fact, renderable on their own! Even if the template has been updated and only the post itself is rendered, it will still display a meaningful representation of the data type as it was when it was created.

While our original Hackathon project was tailored towards developers and UX designers who would love to see a forms and fields API in WordPress, this prototype puts more power in the hands of low- to no-code WordPress users.

It also opens up a world of possibilities for providing a rendering view for any structured data. Imagine uploading a CSV and mapping the column names to block attributes, or connecting to a database or JSON API to map the records in the same way. 

For example, if you had a CSV with business names, addresses, a rating, and a description, we could take that template post and insert a map block, a heading block, a star rating block, and a paragraph block and set the attributes to map to the CSV columns. It’s essentially an instant structured data renderer!

But even if we can define custom post types and fields in the editor, should we, as a WordPress community, consider adding it to core?

The existential question: Should it exist?

Adding this kind of functionality into WordPress core could open up a ton of opportunities for the average WordPress user. Instead of needing to get a developer involved to add a custom post type to their site, a user could simply do it themselves and define the necessary fields and structured data attributes. 

On the other hand, allowing everyday users, who may not have a full grasp of how custom post types and structured data should work, free reign to create these data types themselves could have detrimental effects on the user experience of their websites. Clunky or incorrect implementation of structured data markup could also cause issues with how search engines crawl these sites, causing unintended negative impacts to search traffic.

Not only that, but as of right now, if a custom post type is accidentally deleted, all of the content posted to that custom post type will no longer be accessible through the admin (even though it will still be stored in the database). The user could think they “lost” their data.

Let’s talk about it

What do you think? Are you in favor of giving website owners the ability to change and customize their custom post types and attributes? Or are there some website features that should always require a more technical hand and implementer? 

We’d love to chat with you about your thoughts in the comments below.

For another interesting exploration on a related idea, check out this discussion on GitHub with the core team.

Thanks to Lars Gersmann for leading the JSON Schema project with me and to everyone on the Syntax Errors team: Adam Zieliński, Dennis Snell, Julian Haupt, Michael Schmitz, Anja Lang, Thomas Rose, Marko Feldmann, Fabian Genes, Michael Schmitz, Jan Vogt, Lucisu, Maximilian Andre, Marcel Schmitz, and Milana Cap.
Quelle: RedHat Stack

Site-Building Made Simple: Introducing the Public Pattern Library 

When it comes to website-building, WordPress themes set your site up for success by providing stylish, preselected options for fonts, colors, and layouts. Even though themes provide the overall aesthetic, you still need to build out the posts, pages, and templates on your site. That’s where block patterns come in!

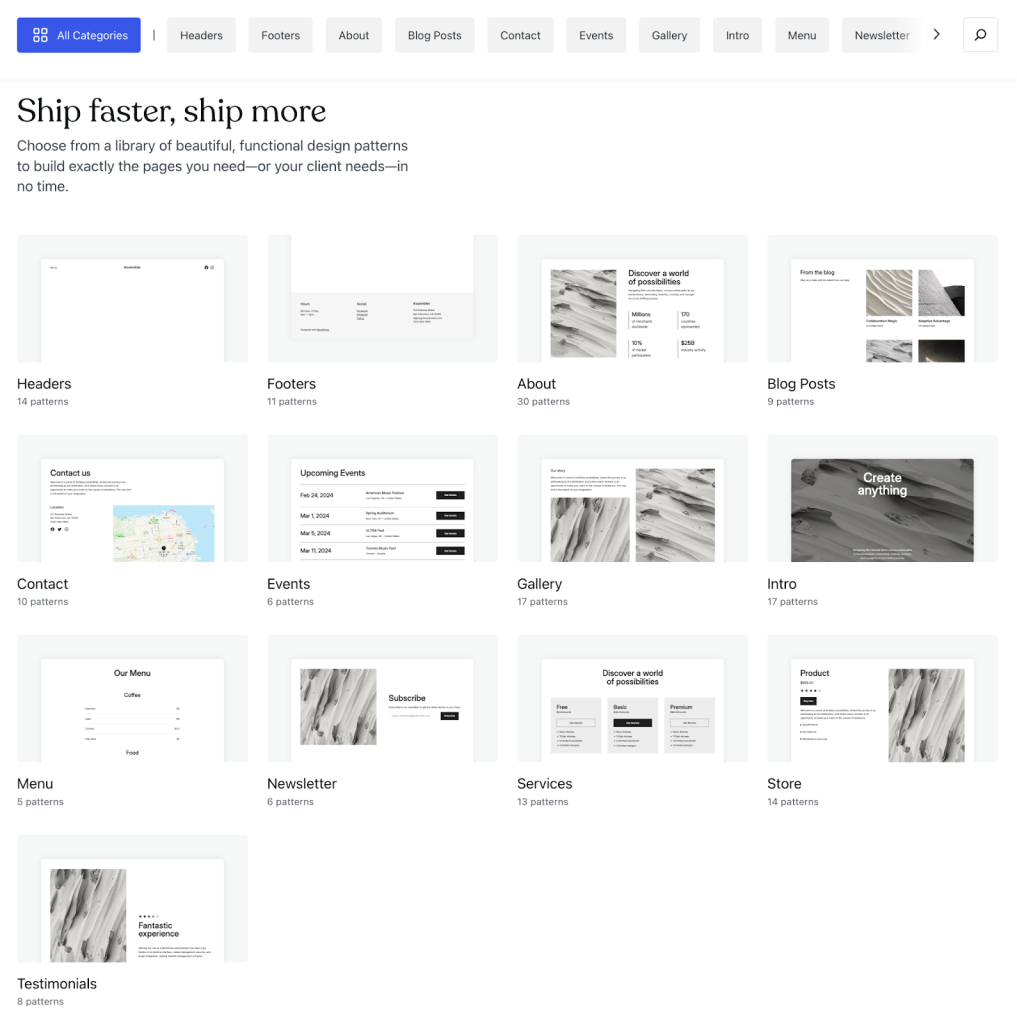
The WordPress.com Pattern Library is your new go-to resource for finding any kind of pattern for your beautiful WordPress website. With hundreds of pre-built patterns to choose from across over a dozen categories, you’ll be covered no matter your website’s specific needs. 

What are patterns?

Block patterns are collections of blocks made to work seamlessly with our modern themes. Need an “About” page? Check. A gallery? Check. A testimonial? Check. How about a newsletter? Check. We have just about anything you’ll need. 

Best of all: for each pattern, the fonts, colors, and spacing will adapt to your theme’s settings, making for a cohesive look. Still, patterns aren’t locked or static either—after you’ve added the pattern to your post, page, or template, you can tweak it however you like. 

A tour of the Pattern Library 

This new public Pattern Library allows you to browse, preview, and easily share or implement whichever design speaks your tastes. Let’s take a look around. 

Browse all categories 

If you want to explore the Pattern Library and don’t have anything in particular that you’re looking for, click through each category to spark some ideas. 

Search for what you need 

At the top, you’ll find a fast and easy-to-use search box, allowing you to find exactly what you need. This is a great option if you don’t feel like browsing and want to jump right into a solution for your specific needs. 

Explore page layouts 

Sometimes you just need the components of a post, page, or template: a header, a “Subscribe” box, a store module, etc. Other times, you want to be able to copy and paste an entire page into existence. Scroll down past the categories and you’ll find our full-page patterns for whole pages: About, Blog, Contact, Store, and more. 

Test the mobile responsiveness for each pattern

When looking through the library on a desktop or laptop device, you’ll see a gray vertical bar next to each pattern. That’s a nifty little slider that we’ve built into the library which allows you to see how each pattern responds to different screen sizes. Using your cursor to move the bar to the left, you’ll see what that design looks like on a mobile device; in the middle is where most tablets fall; and scroll back all the way to the right for the desktop/laptop version. 

Copy and paste to your website 

Like what you see? Simply click the blue “Copy pattern” button, open the WordPress.com editor to the post, page, or template you’re working on, and paste the design. It’s that easy. Once inserted, you can customize each block as needed using the right sidebar. 

Your new favorite page-building tool

The Pattern Library is especially useful if you build websites for clients. Each pattern is built to work with any theme that follows our technical standards, speeding up page-building not just for you but also for your clients—all while maintaining the overall style of your theme. 

In concrete terms, this means that our patterns take font, color, and spacing settings from the theme itself rather than using standard presets. This makes it far less likely for a site to break (or just look off) when you—or a client—experiment and make updates. 

Our goal is always to make your life both easier and more beautiful. This new resource does just that. Check out the WordPress.com Pattern Library today to enhance your website-building experience! 

Take me to the patterns!

Quelle: RedHat Stack

10 WordPress Influencers to Follow in 2024  

In this “Build and Beyond” video, Jamie Marsland highlights 10 WordPressers to keep an eye on in 2024. 

A couple of weeks ago, we shared a list of 15 WordPress developers you should follow to stay on top of WordPress development news and tips. This video broadens the scope and features folks worth following, regardless of your role or experience with WordPress. If you’re at all interested in or curious about WordPress, these are folks to pay attention to.

Interested in a free trial that allows you to test our all that WordPress.com has to offer? Click below:

WordPress.com/Jamie

Remkus de Vries

Remkus is a well-known figure in the WordPress community, recognized for his contributions to WordPress development and his overall expertise in web technology.

Website | YouTube

Kevin Geary

Kevin helps digital agency owners, freelancers, and web designers to learn best practices for UX/UI design, development, and CSS.

Website | YouTube

Tyler Moore

Tyler has free video lessons on YouTube that teach people how to create their own professional website without any coding experience.

Website | YouTube

Sabrina Zeidan

Sabrina is a WordPress performance engineer, who’s daily work is to speed up WordPress websites, plugins, and themes.

YouTube

Mike McAlister

Mike is a designer and principal software engineer from the USA. He builds killer products and brands that people love, including the fantastic Ollie WordPress theme.

Website | X (Twitter)

Jonathan Jernigan

Jonathan runs a small web development agency, creates courses, and makes YouTube videos. He started is WordPress-focused YouTube channel in late 2018.

Website | YouTube

Birgit Pauli-Haack

Birgit works as developer advocate for WordPress, curates community voices on Gutenberg Times, and co-hosts the Gutenberg Changelog podcast.

Website | X (Twitter)

David McCan

For the past 20 years David has worked professionally developing websites and in IT management.

Website | Facebook

Paul Charlton

Paul has over 15 years of commercial web design and development experience working on a large range of diverse projects, with clients ranging from start-ups to blue-chip companies.

Website | YouTube

Matt Medeiros

The WP Minute, founded by Matt, is a website dedicated to delivering the most important news and topics from the WordPress ecosystem, keeping WordPress professionals informed, educated, and entertained.

Website | Podcast

Imran Sadiq

Imran has 17+ years of web design and marketing experience. His YouTube channel has over 55k YouTube subscribers.

Website | YouTube

Rich Tabor

Rich describes himself as a multidisciplinary maker specializing in the intersection of product, design, and engineering.

Website | X (Twitter)

Jamie Marsland

Jamie has trained over 5,000 people on WordPress in the past 10 years, and he also makes WordPress plugins. His YouTube channel is dedicated to helping people with WordPress Blocks.

Website | YouTube

Quelle: RedHat Stack

Streamlining Your Content Creation: Adding Images From Your Phone With Ease

The internet is rife with small annoyances, which often lead to breakthroughs in user experience. For example, needing to hit “refresh” or “next page” led to infinite scroll, which is now baked into our media consumption habits. 

Today, we’re excited to share a new feature in the desktop editor and Jetpack mobile app that eliminates one of those small annoyances and makes it a breeze to upload media to your WordPress posts and pages.   

While working in the editor on your laptop or desktop device, you can now seamlessly add photos directly from your phone. 

Here’s how to do it: 

Insert an “Image” or “Gallery” Block on your post/page. 

Click “Select Image”: From the dropdown menu, select “Your Phone.”

Use your phone to scan the QR code: This will automatically open the Jetpack app and then your photo library. 

Choose your image(s): From there, simply click the image or images you wish to add to your post/page.

Click “Add”: Watch your image(s) automagically appear in your desktop editor.

Check it out in action below:

We hope this will inspire you to snap even more photos and share them with the world. 

Get the app

Quelle: RedHat Stack

A Visit to Where the Cloud Touches the Ground

Hi there! I’m Zander Rose and I’ve recently started at Automattic to work on long-term data preservation and the evolution of our 100-Year Plan. Previously, I directed The Long Now Foundation and have worked on long-term archival projects like The Rosetta Project, as well as advised/partnered with organizations such as The Internet Archive, Archmission Foundation, GitHub Archive, Permanent, and Stanford Digital Repository. More broadly, I see the content of the Internet, and the open web in particular, as an irreplaceable cultural resource that should be able to last into the deep future—and my main task is to make sure that happens. 

I recently took a trip to one of Automattic’s data centers to get a peek at what “the cloud” really looks like. As I was telling my family about what I was doing, it was interesting to note their perception of “the cloud” as a completely ephemeral thing. In reality, the cloud has a massive physical and energy presence, even if most people don’t see it on a day-to-day basis. 

Automattic’s data center network. You can see a real-time traffic map right here.

A trip to the cloud

Given the millions of sites hosted by Automattic, figuring out how all that data is currently served and stored was one of the first elements I wanted to understand. I believe that the preservation of as many of these websites as possible will someday be seen as a massive historic and cultural benefit. For this reason, I was thankful to be included on a recent meetup for WordPres.com’s Explorers engineering team, which included a tour of one of Automattic’s data centers. 

The tour began with a taco lunch where we met amazing Automatticians and data center hosts Barry and Eugene, from our world-class systems and operations team. These guys are data center ninjas and are deeply knowledgeable, humble, and clearly exactly who you would want caring about your data.

The data center we visited was built out in 2013 and was the first one in which Automattic owned and operated its servers and equipment, rather than farming it out. By building out our own infrastructure, it gives us full control over every bit of data that comes in and out, as well as reduces costs given the large amount of data stored and served. Automattic now has a worldwide network of 27 data centers that provide both proximity and redundancy of content to the users and the company itself. 

The physical building we visited is run by a contracted provider, and after passing through many layers of security both inside and outside, we began the tour with the facility manager showing us the physical infrastructure. This building has multiple customers paying for server space, with Automattic being just one of them. They keep technical staff on site that can help with maintenance or updates to the equipment, but, in general, the preference is for Automattic’s staff to be the only ones who touch the equipment, both for cost and security purposes.

The four primary things any data center provider needs to guarantee are uninterruptible power, cooling, data connectivity, and physical security/fire protection. The customer, such as Automattic, sets up racks of servers in the building and is responsible for that equipment, including how it ties into the power, cooling, and internet. This report is thus organized in that order.

Power

On our drive in, we saw the large power substation positioned right on campus (which includes many data center buildings, not just Automattic’s). Barry pointed out this not only means there is a massive amount of power available to the campus, but it also gets electrical feeds from both the east and west power grids, making for redundant power even at the utility level coming into the buildings.

The data center’s massive generators.

One of the more unique things about this facility is that instead of battery-based instant backup power, it uses flywheel storage by Active Power. This is basically a series of refrigerator-sized boxes with 600-pound flywheels spinning at 10,000 RPM in a vacuum chamber on precision ceramic bearings. The flywheel acts as a motor most of the time, getting fed power from the network to keep it spinning. Then if the power fails, it switches to generator mode, pulling energy out of the flywheel to keep the power on for the 5-30 seconds it takes for the giant diesel generators outside to kick in.

Flywheel energy storage diagram.

Those generators are the size of semi-truck trailers and supply four megawatts each, fueled by 4,500-gallon diesel tanks. That may sound like a lot, but that basically gives them 48 hours of run time before needing more fuel. In the midst of a large disaster, there could be issues with road access and fuel shortages limiting the ability to refuel the generators, but in cases like that, our network of multiple data centers with redundant capabilities will still keep the data flowing.

Cooling

Depending on outside ambient temperatures, cooling is typically around 30% of the power consumption of a data center. The air chilling is done through a series of cooling units supplied by a system of saline water tanks out by the generators. 

Barry and Eugene pointed out that without cooling, the equipment will very quickly (in less than an hour) try to lower their power consumption in response to the heat, causing a loss of performance. Barry also said that when they start dropping performance radically, it makes it more difficult to manage than if the equipment simply shut off. But if the cooling comes back soon enough, it allows for faster recovery than if hardware was fully shut off. 

Handling the cooling in a data center is a complicated task, but this is one of the core responsibilities of the facility, which they handle very well and with a fair amount of redundancy.

Data connectivity

Data centers can vary in terms of how they connect to the internet. This center allows for multiple providers to come into a main point of entry for the building.

Automattic brings in at least two providers to create redundancy, so every piece of equipment should be able to get power and internet from two or more sources at all times. This connectivity comes into Automattic’s equipment over fiber via overhead raceways that are separate from the power and cooling in the floor. From there it goes into two routers, each connected to all the cabinets in that row.

Server area

As mentioned earlier, this data center is shared among several tenants. This means that each one sets up their own last line of physical security. Some lease an entire data hall to themselves, or use a cage around their equipment; some take it even further by obscuring the equipment so you cannot see it, as well as extending the cage through the subfloor another three feet down so that no one could get in by crawling through that space.

Automattic’s machines took up the central portion of the data hall we were in, with some room to grow. We started this portion of the tour in the “office” that Automattic also rents to both store spare parts and equipment, as well as provide a quiet place to work. On this tour it became apparent that working in the actual server rooms is far from ideal. With all the fans and cooling, the rooms are both loud and cold, so in general you want to do as much work outside of there as possible.

What was also interesting about this space is that it showed all the generations of equipment and hard drives that have to be kept up simultaneously. It is not practical to assume that a given generation of hard drives or even connection cables will be available for more than a few years. In general, the plan is to keep all hardware using identical memory, drives, and cables, but that is not always possible. As we saw in the server racks, there is equipment still running from 2013, but these will likely have to be completely swapped in the near future.

Barry also pointed out that different drive tech is used for different types of data. Images are stored on spinning hard drives (which are the cheapest by size, but have moving parts so need more replacement), and the longer lasting solid state disk (SSD) and non-volatile memory (NVMe) technology are used for other roles like caching and databases, where speed and performance are most important.

Barry showing us all the bins of hardware they use to maintain the servers.

Barry explained that data at Automattic is stored in multiple places in the same data center, and redundantly again at several other data centers. Even with that much redundancy, a further copy is stored on an outside backup. Each one of the centers Automattic uses has a method of separation, so it is difficult for a single bug to propagate between different facilities. In the last decade, there’s only been one instance where the outside backup had to come into play, and it was for six images. Still, Barry noted that there can never be too many backups.

An infrastructure for the future 

And with that, we concluded the tour and I would soon head off to the airport to fly home. The last question Barry asked me was if I thought this would all be around in 100 years. My answer was that something like it most certainly will, but that it would look radically different, and may be situated in parts of the world with more sustainable cooling and energy, as more of the world gets large bandwidth connections.

As I thought about the project of getting all this data to last into the deep future, I was very impressed by what Automattic has built, and believe that as long as business continues as normal, the data is incredibly safe. However, on the chance that things do change, I think developing partnerships with organizations like The Internet Archive, Permanent.org, and perhaps national libraries or large universities will be critically important to help make sure the content of the open web survives well into the future. We could also look at some of the long-term storage systems that store data without the need for power, as well as systems that cannot be changed in the future (as we wonder if AI and censorship may alter what we know to be “facts”). For this, we could look at stable optical systems like Piql, Project Silica, and Stampertech. It breaks my heart to think the world would have created all this, only for it to be lost. I think we owe it to the future to make sure as much of it as possible has a path to survive.

Our group of Automatticians enjoyed the tour—thank you Barry and Eugene!
Quelle: RedHat Stack